Resources
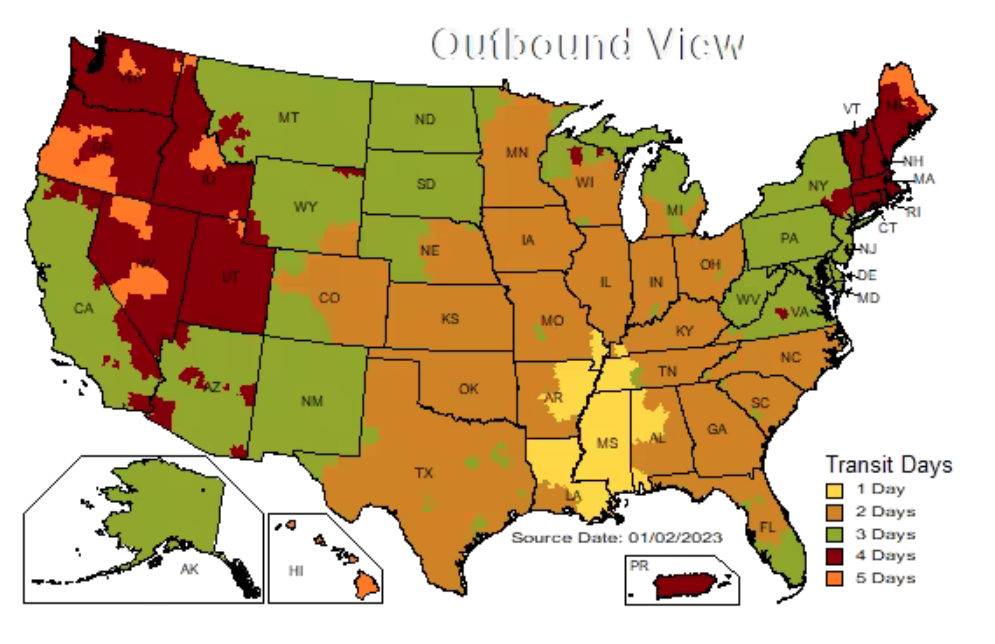
How Long Will Shipping Take?

How Do I Find the Information that D.I. Requires for the Rental Order Form?
- Roof Panel Information
- Square Footage
- Seam Height
- Roof Pitch
- Roof Radius
- Perimeter Clips
- End Laps
Roof Panel Information is required so we know what profile that you are working with and who made it. DI works with just about all panel manufacturers and is familiar with all roof panels that are available on the market today. However, to correctly setup your Roof Seamer, we need to know the following information:
Panel Manufacturer: We are looking for the name of the company that produces the roof panel. (Example: ATAS International, McElroy Metal, Firestone Building Products, etc.*)
PANEL NAME: Roof Panel Manufacturers give unique names to all of their products to set them apart from their competition. We are looking for the name that they have given the specific panel that you are working with. Keep in mind that you may have multiple types of panels on one job.
Roof Finish: There are many types of finishes available for roof panels today. We will want to know if your roof panel is painted or not. This is specifically designed so we will know what tooling to equip your roof seamer with. If a roof seamer's tooling has ever been run on a panel with a galvaume finish, pitting can occur from the galvalume flakes embedding into the tooling. If the same tooling is ever used on a painted panel, it can easily damage the paint finish. For this reason, DI segregates all of our tooling so if a roller has ever been used on a galvaume panel, it will NEVER be used on a painted panel again.
Seam Height: Simply measure from the base (pan) of the panel to the top of the unseamed rib. This dimension is usually measured in inches such as 1.5" or 2". Commonly, if you are working with a trapezoidal style panel, the seam height will always be 3".
Material Gauge
The gauge of the material that you are working with is critical to the setup of your roof seamer. When filling out the order form, all materials are assumed to be steel, unless you tell us otherwise. D.I. can work with many materials including steel, copper, aluminum, stainless steel and zinc. For steel panels, you may measure the gauge using a set of calipers. Use the reference chart below to determine your material's gauge.
| MATERIAL T HICKNESS | GAUGE |
| 0.064" | 14 |
| 0.051" | 16 |
| 0.045" | 17 |
| 0.040" | 18 |
| 0.032" | 20 |
| 0.025" | 22 |
| 0.020" | 24 |
| 0.016" | 26 |
| 0.012" | 28 |
Square Footage (Sq. Ft.) is required to let us know how big your project is. This number does not have to be exact, but it needs to accurately represent the scope of your job. To determine the total square footage of a project, simply multiply the length by the width of the total roof.
In the example below, the roof is 240' X 80'. When multiplied together, it shows us that the total square footage is 19,200 sq.ft.

Calculate the Square Footage of YOUR project using the calculators below
Helpful Information If an area is rectangular, the method is simple: Round each measurement up to the nearest foot or half foot. Then, multiply length by width. For triangular and circular areas, the calculation is typically more complicated.
To figure the area of a circle, multiply 3.14 (pi) times the square of the radius (the distance from the center of the circle to the circles’ outside edge or circumference). To calculate the area of a right triangle (that is, a triangle with one 90-degree angle), multiply 0.5 times the base (the short line attached to the right angle) times the height (the long line attached to the right angle). Or, just fill in the blanks above. If an area is irregularly shaped, divide it up into rectangles and right triangles as precisely as possible. Figure the area of each rectangle or triangle, and add up all the figures.
Seam Height is determined by measuring the height of the female leg of the roof panel. You should measure from the base of the panel (pan) to the top of the leg. This measurement does not have to be exact. Commonly, roll formers will form the dimension differently from panel-to-panel. The most common seam heights are 1", 1.5", 2" and 3".
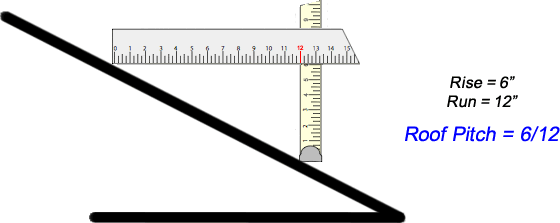
Roof Pitch is measured by "rise over run". This is a common civil engineering term meaning the "slope" or "pitch" of a roof. You can measure "rise over run" by taking a level and placing it horizontally from any point on the slope of a roof. Take a scale of your choice and allow it to hang straight down from the 12" mark (you can use a plumb-bob for reference if necessary). The distance from the roof surface to the level is your "rise". As a standard, "run" is always 12" when dealing with roofing. Therefore, your roof pitch will always be x/12 with the x representing your "rise" number.
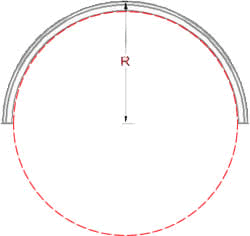
Roof Radius is measured by pretending that your curved roof panel makes a complete circle. The distance from the center of that circle to the panel, is the radius. In the diagram, "R" stands for the radius of the panel. D.I. has special machines that can run a seam between two panels with only a slight curve to it, right down to a 48" radius!
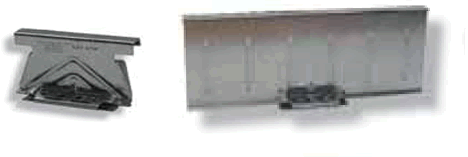
Perimeter Clips are used in various locations on a roof that may be affected by high winds. These are usually seen in the plain states or in coastal regions of the U.S. The decision to use perimeter clips is usually decided between the building manufacturer and your designer or architect as dictated by local building codes. The only difference between one of your regular clips and a perimeter clip is the size and UL ratings. A perimeter clip is utilized, as the name implies, around the perimeter of the roof to give it added strength. These are not used in the "field" of the roof.
End Laps refer to the location where a roof panel may overlap another roof panel. This information is required so that we may equip your roof seamer to deal with sudden introductions of thicker materials. If at any time the machine is running along a rib, and is suddenly given twice the amount of material to form as it was a second before, it can damage the machine if it is not prepared and adjusted for it when it leaves the factory and comes to you.
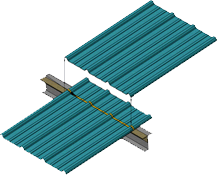
Common Problems That Are Seen on a Standing Seam Roof System & How to Avoid Them on Your Jobsite
- Modulation and Installation Problems
- Pillowing and "Oil Canning"
- Clip/Concealed Fastener Problems
- Roof Panels formed incorrectly by Portable Roll Former
- Surface Contaminants
- Not understanding how to use the Roof Seamer
- Other Common Problems


The pans, or the base, of the panels are too far apart. This creates improper mating between the male and female legs of the roof panel. In an attempt to keep the panels from moving, self-drilling screws were used. A roof seamer will NOT produce a satisfactory seam when panels are installed in this manner.
D.I.'s Modulation Clamps would have solved this problem if used during the installation process. This is also a great example of why you should always "seam as you go" instead of attempting to seam the roof after installation.


This is another example of roof panels that were installed out of modulation. In the photo to the right you will notice that they actually attempted to seam this panel.


This roof had to be removed and reinstalled AT THE BUILDER'S EXPENSE! Modulation problems affect the weather tightness and sustainability of any standing seam roof system.


Thick insulation caused these roof panels in the left photo to separate after they had been nested together and installed. Each panel had to be forced back down before the roof seamer was introduced. Even though one side of the panel was secured by the clip, a strong gust of wind would have had a terrible effect on this jobsite.
"Oil Canning" occurs when the roof panels have been placed in a bind and a "wave" appears in the pan of the roof panel such as in the photo on the right. This usually occurs when you are working with an uneven substrate or have an issue with incorrect clip installation. Although this is an acceptable seam and project, the cosmetic appearance is severely affected due to poor installation practices.


Incorrect clip installation is made evident after the roof seamer has seamed the panel. These clips had a hook on them that needed to be engaged on the male leg of the panel; obviously, this did not get done.
You can expect a minimal amount of "clip bleed-thru", but too much may be considered unacceptable. Always ensure that correct clip installation has been done before installing the next roof panel.


This panel was rolled from a portable roll former at the jobsite. The portable roll former had not been checked, calibrated or certified for months! To the untrained eye, the panels were acceptable. When this crew attempted to seam the roof, they ran into problems. After multiple attempts to reach the owner of the portable roll former without success, they called D.I.
D.I.'s Technical Service Rep. was able to design a custom roof seamer in the field, call in the design over the phone and have it built and overnighted to the jobsite. Our TSR and his team stayed through the completion of the project to ensure that no more issues came up even though the new roof seamer arrived the very next morning.


Any kind of surface contaminants can cause may types of problems when you begin seaming. If there are obstructions in the pan of the panel (left photo) where the wheels ride beside the seam, it can cause the roof seamer to lean to one side. This will commonly not cause any problems with the seam itself, but if left uncorrected, would eventually begin to alter the finished seam profile.
If there are contaminants on the seam itself (right photo) when the tooling of the roof seamer passes over it, it can cause actual small penetrations in the panel material. This would give the panel opportunity to leak in the future.


Be sure to read the Owner's/Field Guide BEFORE operating the Roof Seamer -- not AS you operate the Roof Seamer. This panel was disfigured when the installer did not understand how to apply the Roof Seamer to the panel. If you are unsure how to use the machine, contact D.I. Technical Support at 1-888-343-0456 for assistance or click here to watch a video about the use and operation of your particular roof seamer.


Never install a roof penetration before you complete seaming. In this case, the roof panel was seamed to a 90° profile before the penetration was installed. However, the architect had called for the roof to have a 180° finished seam profile. Since the roof vent had already been completed, a special set of hand crimpers had to be used to finish this job.
Click here to submit a photo of a problem that you have experienced. Please let us know how the problem was resolved so that others can learn how to avoid the same problem on their project. DO NOT include any information about the contractor, installer, job specifics or panel manufacturer.
Helpful Information
- Roll Forming v. Flat Forming - a simple explanation between the two processes of forming roof panels
- Thermal Movement - an important concept to understand when dealing with a standing seam roof system & pre-fabricated metal buildings
- Wind Uplift Testing - how the quality and capability of a roof system is tested
- Clip Bleed-Thru - a common occurance in our industry. Understand why it happens and how to minimize it on your project!
- Oil Canning - can sometimes be seen on metal roof systems. Click to read the Metal Construction Association's opinion about this matter.
Roll Forming is a continuous metal forming process taking sheet, strip, or coiled stock and bending it between successive pairs of rolls that increasingly bends it until the desired shape is completed adding both strength and rigidity to lightweight materials.
Flat Forming is the same process, but is done without the rollers. Instead, it utilizes a "pinching" action and forms the stock in a non-continuous process.
In the case of a roof seamer, roll forming occurs when the roof seamer is moving along a rib. The unseamed panel is fed through the front of the machine, passed through a set of forming rollers and a finished seam is produced. It is the gradual process of each set of tooling moving the metal a little at a time until the desired shape is achieved that makes a roof seamer a "roll forming machine".
In contrast, when you use a hand crimper to start the roof seamer onto the panel, this is flat forming. You physically take the rib and "pinch" it in one area at a time.
If you have ever been around a standing seam metal roof before, take note of the beginning of each seam. Although it will be difficult to see, you will be able to distinguish the small differences between the two forming processes.
Thermal Movement is the term to simply describe the fact that metal moves! Metal can grow and shrink depending on the elements surrounding it. This is a significant effect to consider when working with a metal building and especially a metal standing seam roof system. If you simply put a screw through a roof panel into a purlin, the constant expansion and contraction of the metal would force the hole through the roof panel to grow and would very quickly create a leak.
This event is solved with a standing seam roof system because of a key element, the "floating" concealed fastener, or "clip". This clip is made of two separate parts. The base remains stationary as it is attached to the purlin or other substrate. The actual clip inside of the seam is attached to the base on a set of tracks that allows it to slide or "float". This small amount of motion is enough to accommodate for the thermal movement that will occur.
One end of the roof panel will always be attached to the building. The panel will be firmly attached to the building itself, either at the eave or at the peak of the roof. If it wasn't, the clips would simply allow the roof panels to slide completely off of the roof! While one end is held stationary, the other end of the panel is allowed to grow and shrink with the thermal movement occurring under the ridge cap or rake trim. Having the movement take place under another covering will easily prevent leaks.
W IND U PLIFT T ESTING†
This test is conducted to check the ability of a standing seam roof system to withstand high winds that would create uplift on the roof of a building. When wind travels over a building, uplift is created by the void at the top of a wall.
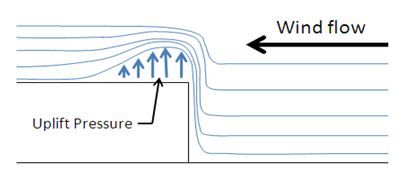

This uplift pressure creates suction on the roof of the building that can potentially cause damage to the roof system. The roof system is made up of the roof panel and the clip that is used to secure the panel to the substrate. To recreate this uplift in a controlled environment is difficult. Most testing simulates winds in excess on 100+ mph. Based on the test results, the roof system that is being tested is awarded a UL rating. Of course, as a builder, you are looking for the highest test results that you can. This ensures a great roof system that is dependable and you will not be afraid to stand behind in the years to come.
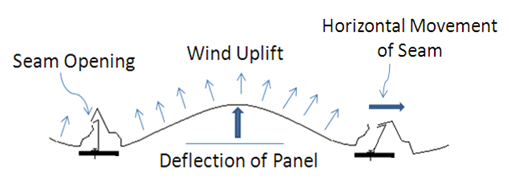

When the roof system is tested in an uplift facility, more often than not, it is a D.I. Roof Seamer seaming the panels together. We are proud of our quality products and our association with such strenuous testing procedures that mirror our own in-house quality control processes.
† - Information is taken, in part, from publications of Craig R. Dixon and David O. Prevatt, Ph.D., PE
Concealed fasteners, or "clips", are used in the installation of a standing seam roof system. Depending on a manufacturer's specifications, this "clip" may be any variety of thicknesses. A common type of clip seen on the market today is the 20 gauge stainless steel clip; used mostly in an industrial style building. These clips are tested and approved by a manufacturer to give you better performance ratings such as a wind uplift test.
When you are dealing with a standing seam roof panel, no matter of the material
that
it is made of, a uniform and consistence seam is always desired. However, in most all
cases,
there will be an imprint of the clip
that can be seen after the panel has been seamed with a roof seamer through the process
of
roll forming. This is a very common occurrence and is considered acceptable.
For example, let's say that you are working with a 22 gauge steel roof panel
paired
with a 20 gauge floating high clip. When you install these two on a roof system together
and
look down the seamed rib, you will be
able to see the imprint of each of the clips. This is referred to as "clip
bleed-thru".
This happens because you are trying to conceal either an equal or greater amount
of
material under a thinner surface. We can accommodate this occurrence to a certain degree
by
adjusting the seamer to form a looser
finished seam profile. This will form a uniform seam between the clips and reduce the
amount
of clip bleed-thru when the seamer encounters a clip. Sometimes if the profile is
loosened,
it may adversely affect the ratings
or warranty. You will have to refer to your jobsite inspector or panel manufacturer for
additional specifications that may be required by the architect or more information.
Panel Information
Copyright ©
Developmental Industries, Inc.
PRIVACY POLICY
TERMS OF USE


